APIs (Application Programming Interfaces) are the backbone that enables different software systems to communicate with each other. Ensuring that these APIs work correctly is crucial for the overall health of your software. API testing helps developers verify that the APIs function as expected, handle edge cases, and meet business requirements. One of the most popular tools for API testing is Postman. This article will guide you through API testing with Postman, covering everything from the basics to advanced features.
API testing is a critical component of Enozom’s software development and quality assurance process. By leveraging Postman, Enozom ensures that the APIs powering their applications are robust, secure, and perform well under various conditions. The combination of Postman’s powerful features and Enozom’s rigorous testing practices enables the company to deliver high-quality software solutions that meet the needs of their clients and users.
What is API Testing?
API testing is a type of software testing that involves testing APIs directly to ensure they meet functionality, reliability, performance, and security standards. Unlike UI testing, which focuses on testing the user interface, API testing validates the logic and data flow between the various components of an application.
Why Use Postman for API Testing?
Postman is a powerful, user-friendly tool that simplifies the process of API testing. It allows developers and testers to send HTTP requests, examine responses, and automate API tests with ease. Here’s why Postman stands out:
- Ease of Use: Postman’s intuitive interface makes it easy for both developers and testers to create, organize, and execute API requests.
- Supports Multiple Protocols: Postman supports HTTP, REST, SOAP, and GraphQL, making it versatile for different types of APIs.
- Automation Capabilities: With Postman, you can create collections of requests that can be run in sequence, and even automate testing using the Postman Collection Runner or Newman.
- Collaboration: Postman allows teams to share collections, environments, and test cases, making it easier to collaborate on API testing.
Getting Started with Postman
Installation
Before you start testing APIs, you need to install Postman. Postman is available as a desktop application for Windows, macOS, and Linux, as well as a web application that runs in your browser.
- Download Postman: Visit the Postman website and download the version that matches your operating system.
- Installation: Follow the installation instructions for your operating system.
Understanding the Postman Interface
Once you have Postman installed, it’s important to familiarize yourself with the interface:
- Collections: A collection is a group of API requests that can be organized and run together. Collections are a key feature of Postman, allowing you to group related requests.
- Requests: The individual API requests that you send to an API endpoint. These requests can be GET, POST, PUT, DELETE, etc.
- Environment: Postman environments allow you to define variables that can be used across different requests and collections. This is useful for managing different configurations like development, staging, and production environments.
- Response: This is where you can view the API’s response, including the status code, headers, and body.
Creating Your First API Request
Step 1: Create a New Request
To create your first API request:
- Click on the “+” icon or “New” button and select “Request.”
- Name your request and choose the collection where you want to save it.
- Enter the API endpoint in the URL field.
Step 2: Choose the HTTP Method
Select the HTTP method (GET, POST, PUT, DELETE, etc.) from the dropdown next to the URL field. The method you choose depends on the API you are testing.
Step 3: Add Headers and Parameters
- Headers: If the API requires specific headers (e.g.,
Content-Type,Authorization), you can add them under the Headers tab. - Parameters: If your request requires query parameters, you can add them in the Params tab.
Step 4: Add a Request Body (if needed)
For methods like POST and PUT, you may need to include a request body. Switch to the Body tab and choose the format (raw, form-data, x-www-form-urlencoded, etc.) for the data you need to send.
Step 5: Send the Request
Once everything is set up, click the “Send” button. Postman will send the request to the API and display the response in the Response section.
Analyzing the Response
Postman provides a detailed view of the API response, including:
- Status Code: Indicates whether the request was successful (e.g., 200 OK) or encountered an error (e.g., 404 Not Found).
- Response Time: The time it took for the API to respond.
- Headers: Metadata related to the API response.
- Body: The actual data returned by the API, which can be in JSON, XML, or another format.
Writing Tests in Postman
Postman allows you to write automated tests in JavaScript to validate responses. These tests can be used to verify the correctness of the response data, status codes, headers, and more.
Example Test
Here’s an example of a simple test to check if the status code is 200:
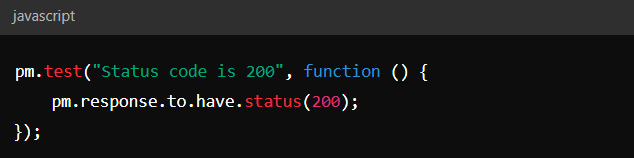
You can add this test under the “Tests” tab in your request. Postman will run the test automatically after the request is sent.
Advanced Testing with Scripts
You can use Postman scripts for more advanced testing scenarios, such as:
- Chaining Requests: Use scripts to pass data from one request to another.
- Dynamic Variables: Generate dynamic values such as timestamps or random IDs.
- Pre-request Scripts: Run scripts before a request is sent, useful for setting up test conditions.
Using Collections and Environments
Creating a Collection
Collections are used to group related API requests. To create a collection:
- Click on “New” and select “Collection.”
- Name your collection and start adding requests to it.
Running Collections
You can run all the requests in a collection sequentially using the Collection Runner. This is useful for testing entire workflows.
Environments
Environments allow you to define variables that can be reused across different requests and collections. This is especially useful when you need to test the same set of APIs in different environments (e.g., development, staging, production).
- Create an Environment: Click on the “Manage Environments” icon and add your environment variables.
- Use Variables: Replace hardcoded values in your requests with environment variables. For example, use
{{baseUrl}}instead of the actual URL.
Automating API Testing with Newman
Newman is a command-line tool that allows you to run Postman collections in CI/CD pipelines. This is useful for integrating API testing into your continuous integration workflow.
Installing Newman
To install Newman, you need Node.js installed on your system. Run the following command to install Newman:

Running Collections with Newman
To run a Postman collection using Newman, use the following command:

This command will execute all the requests in the collection using the specified environment.
Best Practices for API Testing with Postman
1. Organize Requests Using Collections and Folders
- Collections: Group related API requests into collections. This not only makes your workspace cleaner but also makes it easier to manage and run a set of related tests.
- Folders: Within collections, use folders to categorize requests further. For instance, you can have separate folders for user authentication, data retrieval, and data manipulation endpoints.
2. Leverage Environments and Global Variables
- Environments: Use environments to manage different configurations (e.g., development, staging, production). Define variables such as
{{baseUrl}},{{token}}, etc., which can be reused across requests. - Global Variables: For values that are consistent across environments, like API keys, use global variables. This helps reduce redundancy and makes it easier to update values across requests.
3. Use Pre-request Scripts for Dynamic Data Setup
- Dynamic Variables: If your tests require dynamically generated data, use pre-request scripts to create this data before the request is sent. For example, you can generate a unique ID or a timestamp.
- Setup Dependencies: Use pre-request scripts to set up any necessary dependencies, such as fetching a token before making an API call that requires authentication.
4. Write Comprehensive Tests in the Tests Tab
- Status Code Validation: Always validate that the correct HTTP status code is returned. For example, a successful GET request should return a 200 status code.
- Response Data Validation: Verify the structure and content of the response data. Check for expected fields and their values, as well as the overall data format (e.g., JSON).
- Edge Cases: Write tests that cover edge cases, such as empty inputs, invalid data types, and boundary values.
- Chaining Requests: Use Postman’s scripting capabilities to pass data from one request to another, which is essential for testing workflows that require multiple API calls.
5. Avoid Hardcoding Values
- Variables: Instead of hardcoding URLs, headers, or request bodies, use variables. This makes your tests more maintainable and easier to update.
- Reusable Snippets: Create reusable code snippets for common operations (e.g., authentication) and include them in your tests using the Postman Pre-request or Tests tab.
6. Use Postman Monitors for Scheduled Testing
- Automated Testing: Postman monitors allow you to run your collections on a schedule. This is useful for ensuring your APIs continue to work over time, even as changes are made to the system.
- Environment Testing: Set up monitors to run against different environments (e.g., staging and production) to catch issues that might be environment-specific.
7. Integrate Postman with CI/CD Pipelines Using Newman
- Continuous Integration: Use Newman, Postman’s command-line companion, to run collections in your CI/CD pipeline. This ensures that API tests are automatically run every time there’s a code change.
- Automated Feedback: Configure Newman to generate reports and send them to your team so they can quickly address any issues found during automated tests.
8. Version Control Your Collections
- Export and Commit: Regularly export your Postman collections and commit them to your version control system (e.g., Git). This ensures that your API tests are versioned alongside your codebase.
- Collaboration: Share collections with your team via Postman’s built-in collaboration features or through version control to ensure everyone is using the latest tests.
9. Document Your APIs with Postman
- Auto-generated Documentation: Postman can automatically generate documentation from your collections. This documentation can be shared with your team or published to your API consumers.
- Keep Documentation Updated: Ensure that your documentation is updated whenever the API or its tests are modified, so that everyone has access to the latest information.
10. Utilize Postman’s Built-in Tools for Debugging
- Console: Use the Postman Console to debug your requests. It provides detailed logs of all API requests, including headers, body, and scripts, which can help you troubleshoot issues.
- Postman’s Runner: Run collections with the Collection Runner to execute tests in bulk and identify any failures across multiple requests.
Conclusion
API testing is a critical component of modern software development, ensuring that your APIs are reliable, functional, and secure. Postman offers a powerful, user-friendly platform for conducting API tests, from basic requests to complex automated testing scenarios. By following this guide, you can leverage Postman to improve your API testing process, leading to more robust and reliable applications.